

How To Set Up Kreg Jig K4
Are y'all ready to outset using a Kreg Jig? I'yard sharing all of the of import pocket hole instructions and essential Kreg Jig settings that you demand to know!
Using a Kreg Jig
Using a Kreg Jig is one of the easiest ways to build with wood! In this tutorial, nosotros'll acquire how to set up and employ a Kreg Jig. Plus, I'll be sharing important Kreg Jig instructions and Kreg Jig settings that volition aid make building with pocket holes even easier.
You may also savour nine Pocket Hole Mistakes You Don't Want to Make.
For your convenience, this mail service contains chapter links to supplies or tools I used to complete this project. Purchases made using these links assistance back up the Saws on Skates website and allow me to share more than DIY projects. and DIY tips with you. There is no toll to you for using these links. Click hither to visit my site policies.
Earlier nosotros beginning using a Kreg Jig be certain to click the subscribe push button at the lesser of this page to sign up for my FREE weekly newsletter loaded with helpful pocket pigsty tricks, infinite-saving workshop ideas, clever DIY tips and more!
What is a Kreg Jig?
If you're into DIY projects, you lot've probably seen or at least heard about the Kreg Jig. They are all over the web! But what does this slice of bluish plastic exercise?
In a nutshell a Kreg Jig uses pocket holes to bring together pieces of wood or workpieces. Before we get too far into looking at the Kreg Jig let's look at another way to join wood called mortise and tenon joinery.
Mortise and Tenon Joinery
One of the almost mutual methods of joining wood is chosen a mortise and tenon joinery. A tenon, or tongue, is cut with a handsaw or table saw in the end of a slice of forest called a rail.
The tenon fits within a mortise. A mortise is a hole cut with a chisel or past a auto within a slice of forest called a stile that matches the shape of the tenon. Glue is added to the articulation and the result is a very strong connection.
Mortise and tenon joinery has been used for years. Mortise and tenons are a great way to bring together wood. The just downside for many DIYers is that it takes some tools, some time and lots of practice to make perfect mortise and tenon joints.
Pocket Hole Joinery
Today we have an easier and quicker way to bring together wood. We have the Kreg Jig and pocket hole joinery. I employ pocket hole joinery to build nearly all of my DIY piece of furniture projects. I even used pocket holes to build my DIY truck camper!
A Kreg Jig or pocket hole jig uses a guide block with preset holes to drill angled pocket holes into a workpiece. A pocket screw, specifically designed to be used with pocket holes draws the 2 workpieces together to class a stiff articulation.
Pocket hole joinery is quick and easy. Compared to mortise and tenon joinery, using a Kreg Jig only requires a few unproblematic tools, a pocket-size amount of time, and essentially no practise to brand perfect pocket hole joints. Pocket holes are a simple way for nearly any DIYer to join woods.
Back to Table of Contents
The Nuts of Using a Kreg Jig
Beneath are some basic Kreg Jig instructions that I remember are important to know no matter which Kreg Jig we're using.
Kreg Jig Settings are Based on Cloth Thickness
Many of the Kreg Jig settings are based on the thickness of the cloth that we're joining. There is one exception when it comes to setting up the Kreg Jig K5.
The K5 drill guide is set for the thickness of the material we're joining but the K5 drill bit is ready for the length of the screw we'll be using to join the material. Learn more virtually the Kreg Jig K5 in this post.
We'll demand to know the thickness of the material we're using both when drilling our pocket holes and when we're joining our workpieces with pocket screws.
For instance a 1×iv is actually ¾" thick past 3-½" broad. A two×four is actually 1-½" thick past 3-½" wide.
It's handy to have a tape measure on hand because we'll demand measure if we don't know the thickness of the material we're using.
Use a Corded Drill
I recommend using a corded drill to drill pocket holes. The reason is a corded drill has an advantage over a cordless drill. That advantage is a constant supply of power.
As the battery of a cordless drill begins to lose its charge the drill begins to slow down. A corded drill has a constant supply of power. That constant supply of power keeps a corded drill running at a consistent speed no thing if we're drilling ane pocket hole or one hundred pocket holes.
What does all of this mean for drilling pocket holes? I've noticed as my cordless drill battery starts to lose its charge and the drill begins to boring down that the drill bit appears to tear at the wood rather than slicing through it.
This tearing or tearout makes the edges of the pocket holes look rough or jagged. For the best looking pocket holes become with a corded drill.
Utilize the Dust Collection Port
I recommend connecting a ShopVac if you're using a Kreg Jig with a dust collection port. First, with a ShopVac connected nosotros can drill pocket holes in one pass.
2d, I've noticed pocket holes drilled with a ShopVac connected to the dust drove port announced to have cleaner edges than those drilled without using the dust collection port.
Third, the drill bit has an easier fourth dimension drilling pocket holes when the ShopVac is running and continued to the dust collection port.
Without a ShopVac continued forest chips build upwards in the drill guide. In this case it'due south important to raise the bit several times while drilling the pocket hole to clear the fries. Otherwise the drill fleck has to fight to get through those chips.
Another do good of using a ShopVac and the grit drove port is the clean up is and then much easier. Wood chips pile up on our workbench and spill onto the floor when nosotros don't utilize the dust collection port. Using the grit collection port keeps our workshop tidy and saves fourth dimension when cleaning up.
Related: v Like shooting fish in a barrel Fixes Guaranteed to Forestall Rough Pocket Holes
Back to Table of Contents
Before nosotros get into the nuts and bolts of using a Kreg Jig, I take a suggestion for you lot. If your jig doesn't have the numbers highlighted in white, make your life like shooting fish in a barrel and exercise it yourself. Check out this piece of cake tutorial by The Pursuit of Handyness featured on sawdustgirl.com for more than info.
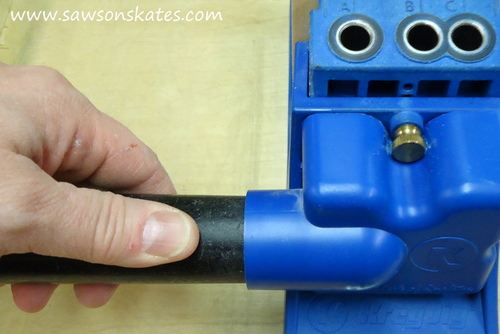
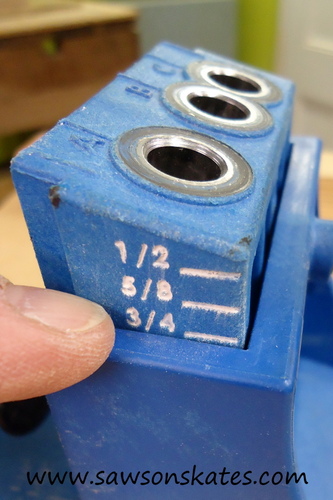
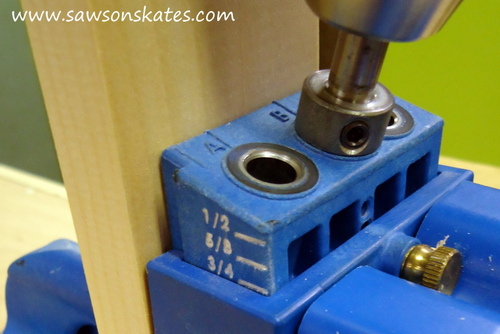
Step 1 – Set up the Drill Guide
The first step to using a Kreg Jig is to adapt the drill guide to the thickness of our workpiece. If our workpiece is i-1/ii″, prepare the jig for 1-one/ii″. For this instance, our workpiece is three/four", so nosotros'll prepare the drill guide to 3/4".
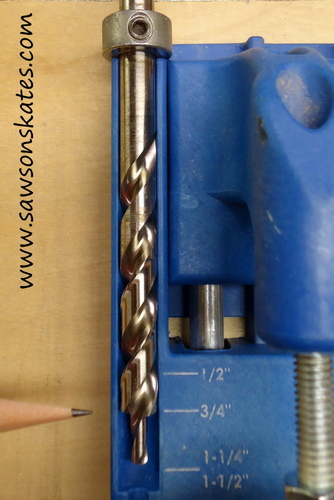
Step 2 – Prepare the Drill
The side by side step is to prepare the drill depth. Over again, nosotros'll want to match the drill depth to the thickness of our workpiece. For this example, our workpiece is iii/4".
Loosen the collar with an Allen key and move the shoulder of the drill flake to correspond with the 3/iv" mark and tighten the collar.
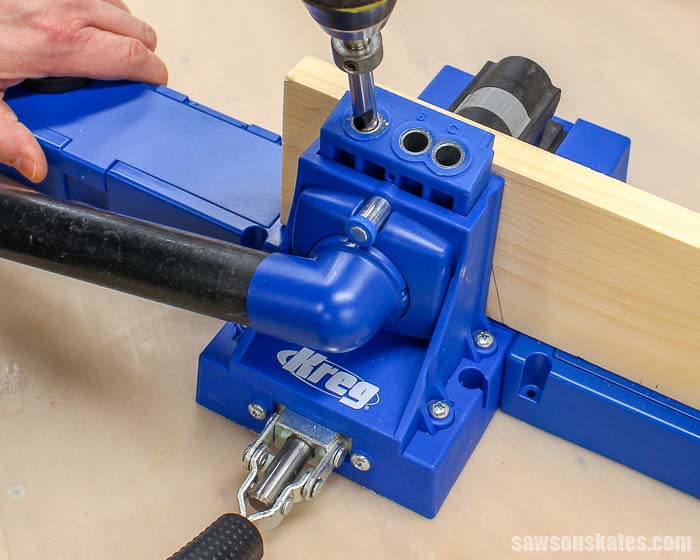
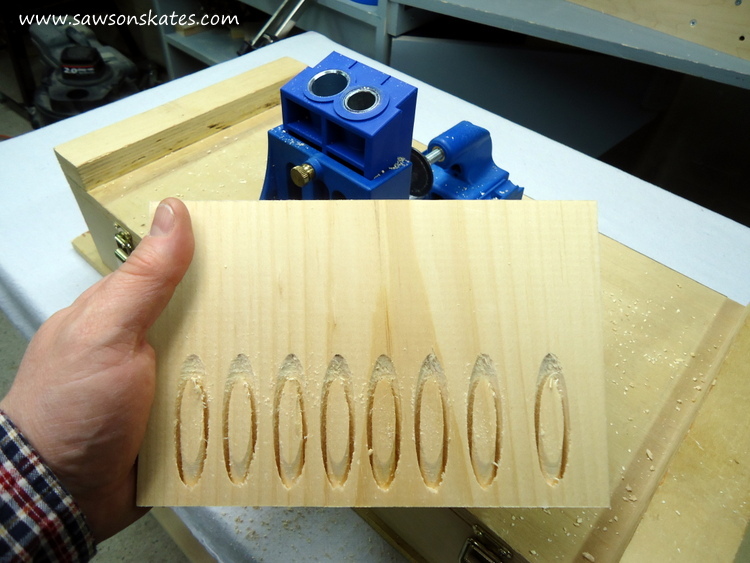
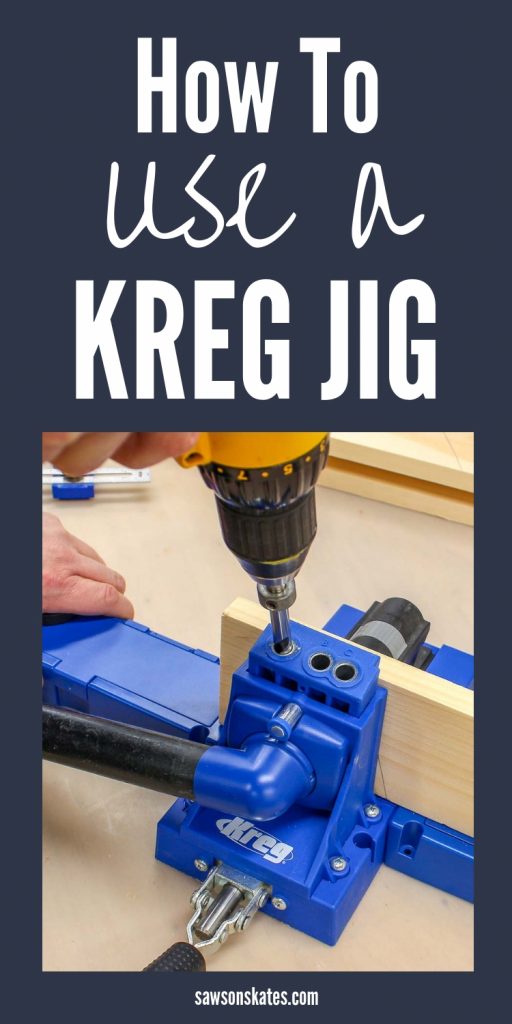
Step 3 – Drill Pocket Holes
Next clamp the workpiece in the jig to correspond with the appropriate drill holes (see tip below). We'll chuck the drill fleck in our drill and insert the drill chip into the guide block until it touches the wood. Slightly heighten the drill flake and bring the drill up to full speed. So gently lower the bit into the wood and showtime drilling the pocket hole. Go along drilling until the collar on the drill scrap contacts the drill guide.
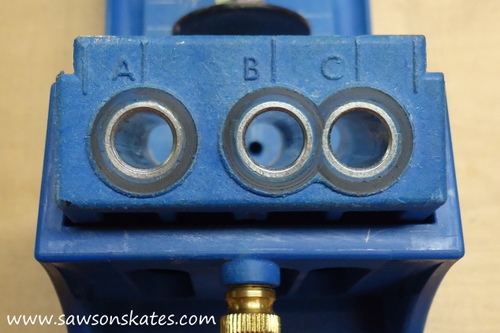
How to Position the Workpiece
- For one-i/two" broad workpieces middle the wood between holes B and C, and drill in holes B and C.
- For 2-1/2" wide workpieces heart the wood between holes A and B, and drill in holes A and B.
- For three-1/2" wide workpieces center the wood betwixt holes A and C, an drill in holes A and C.
- For all other widths make sure your pocket holes are set in a minimum of 3/4" from the edge to avoid perchance dandy the workpiece.
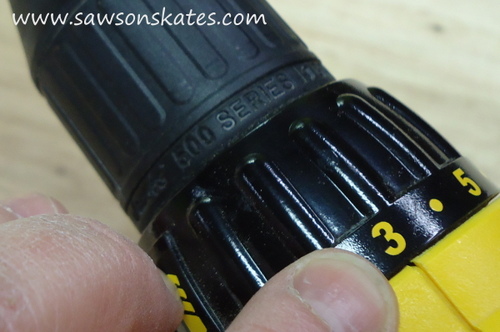
Stride 4 – Join the Workpieces
Clamp the two workpieces we're going to join. I prefer a bar clamp over the Kreg face clench or the Kreg correct angle clamp, but that'southward simply personal preference. The pocket pigsty can easily be stripped, and so information technology's a practiced idea to set the clutch on our drill. My drill works all-time when I set information technology to #three.
Insert the pocket screw and drive it in until it'south only snug. That'southward it. Our articulation is complete!
Using a Kreg Jig: Assembly Tips
Below are some helpful assembly tips I recommend no matter which Kreg Jig yous're using.
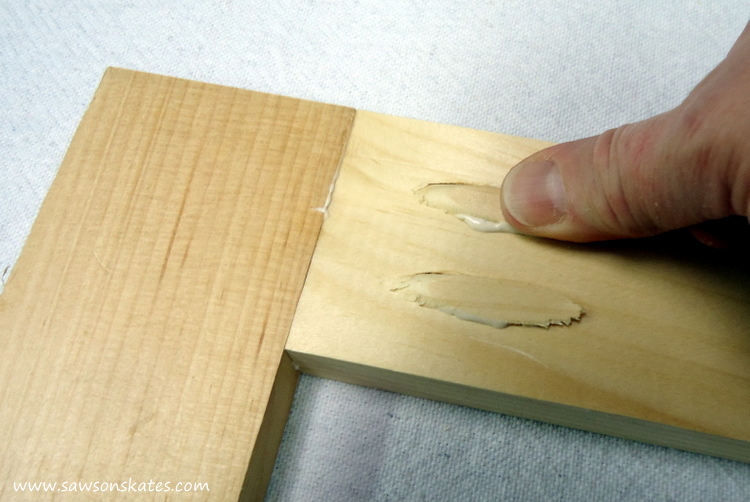
Use Wood Gum
Pocket holes don't crave mucilage for assembly, but I ever use glue when assembling my pocket hole projects. In my opinion, adding mucilage to a pocket hole joint improves the quality of the articulation.
Use Clamps
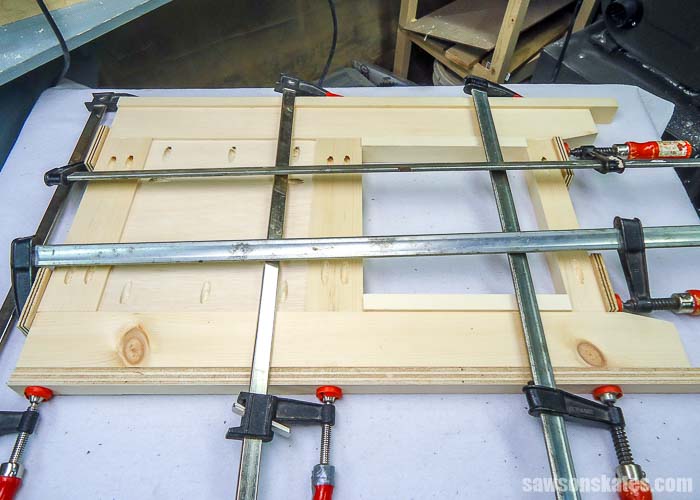
My favorite way to go on parts from moving out of alignment when assembling my Kreg Jig projects is by using an array of bar clamps.
First, I lay out the assembly co-ordinate to my plan. In the example below I'thousand clamping the side assembly for my DIY vanity. Then, I utilise bar clamps to tightly agree the pieces in identify. Using this clamping method prevents whatever movement while I drive my pocket screws.
Clamping the entire assembly also ensures that every joint is properly aligned to the other joints for that assembly.
Related: How to Forestall Pieces from Moving When Assembling Pocket Hole Joints
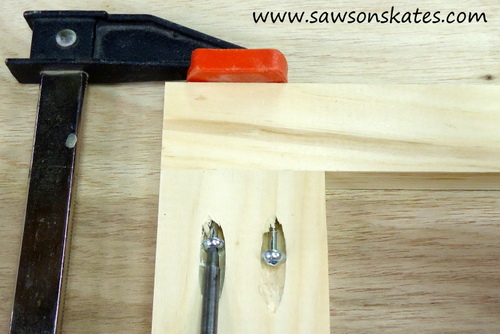
Employ Pocket Screws
All screws are non created every bit. In that location a few cardinal differences between pocket screws and forest screws.
The first difference between pocket screws (left) and wood screws (right) is the shank. Pocket screws only have threads on the lower portion of the shank and wood screws normally have threads along near of the shank.
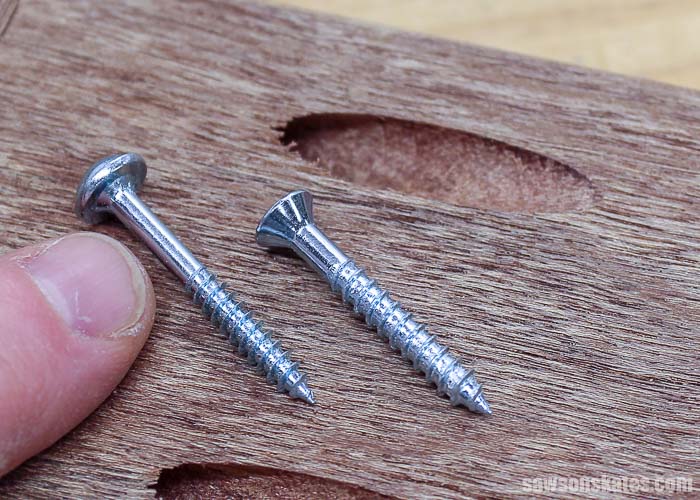
The smoothen upper shank of a pocket screw allows it to slide through the pocket hole. The threaded shank of a wood screw won't slide through the pocket hole. The threads of a wood spiral could bind in the pocket hole which may split the board.
The next difference between pocket screws and wood screws is the head. The stepped drill bit we utilize to drill pocket holes makes a flat area in the lesser of the pocket pigsty.
The flat washer caput design of a pocket screw seats perfectly confronting the flat bottom of the pocket hole and pulls the ii workpieces together.
The countersunk head of a woods screw will crush the apartment bottom of the pocket hole which can split the wood.
Pocket Screw Threads
Pocket screws are available in 2 thread patterns. It's important nosotros choose the correct thread pattern for the type of wood we're working with.
Fine-thread pocket screws are designed to be used with hardwoods like oak, maple, and poplar.
Coarse-thread pocket screws are designed to exist used with softwoods like pine, plywood, and MDF.
Related: seven Ways to Preclude Pocket Screws from Splitting Forest
Back to Table of Contents
Make Your Pocket Holes Most Disappear
The Kreg Pocket Hole Plug Cutter will take your article of furniture building to the next level. The plug cutter makes plugs to fill pocket holes. The plugs are cut from leftover fleck woods from your projection, and so the plugs will exactly match the wood color and wood grain of your project.
The plugs are glued into the pocket holes and so sanded flush. With a pocket hole plug cutter, your pocket holes virtually disappear and your DIY furniture will await more than professional person. This a "gotta have it" tool for the DIYer! Please check out my plug cutter setup tips and video!
Don't Make These Pocket Hole Mistakes
Chief your pocket hole projects with this FREE 10-page Pocket Hole Mistakes You Don't Want to Brand Guide! The guide is inundation with useful hints and piece of cake tips to help you avoid time-consuming mistakes. Click below, get your FREE guide, and tackle your next pocket hole project with confidence!

Final Thoughts
There information technology is… how to use a Kreg jig in a nutshell. Equally always, please contact me if you lot have any questions or need help setting up your jig. Skilful luck!
Oh, and if you found this information helpful, would you please pivot information technology to Pinterest? I would really appreciate it!
42.652579 -73.756232
Source: https://sawsonskates.com/how-to-set-up-and-use-a-kreg-pocket-hole-jig/
0 Response to "How To Set Up Kreg Jig K4"
Post a Comment